Before you can start your task you will need to prepare a client system with the following requirements:
-
Installation of 64 Bit Windows Operating System
-
Installation of Powershell 2.0
-
Installation of .NET Framework 3.51
-
Installation of Outlook Office 2010 64 Bit (which is currently in CTP release available)
-
Installation of Exchange Server 2010 management tools
-
Create domain membership for this client
-
Logon with an administrative account with Exchange’s full administrative permissions
Exchange Server 2010 comes with Roll-based Administration; you will need to run the following command first though:
New-ManagementRoleAssignment –Role “Mailbox Import Export” –User “<username>”
This command gives the user permission to import and export mailboxes. Another way of doing this is creating an Active Directory group and adding permissions to this group using the following command:
New-ManagementRoleAssignment –Role “Mailbox Import Export” –Group “<usergroup>”
When you are done, you will only have to add users to this group to allow them to export and import mailboxes.
If we take a look at how to import a mailbox, you will see that the powershell command for this task is actually quite simple:
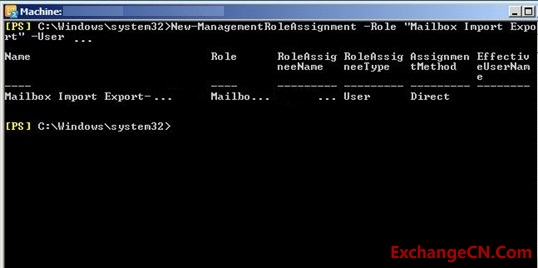
Figure 1: Importing a mailbox
If we now take a look at how to export a mailbox, you will realize how easy this is too! The following are the steps you need to take to carry out this task.
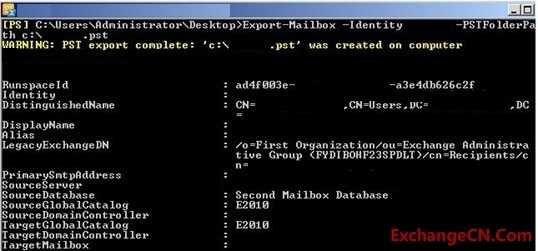
Figure 2: Starting a Mailbox Export
This procedure may take some time because this depends upon how big the personal folder itself is. Do not panic if it takes its time.
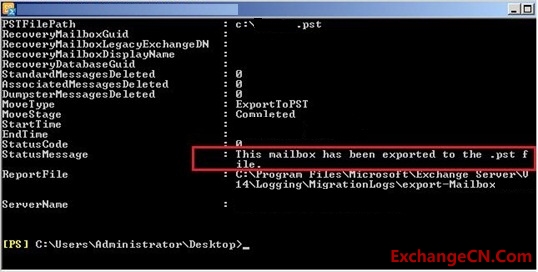
Figure 3: Finalizing the Mailbox Export
As you might have realized, all these steps are Powershell commands. In the Release Candidate of Exchange Server 2010 there is no way of doing this in the graphical interface. With Exchange Server 2010 Beta Release there is a way of doing this there too.
Hopefully this feature will be back in the RTM release of Exchange Server 2010, I will show you now how this will work.
After having installed Outlook 2010 in 64-Bit on the “Ex-/Import-Computer”, you will have two new commands (if you look at the context menu of each mailbox). These are “Export Mailbox” and “Import Mailbox”.
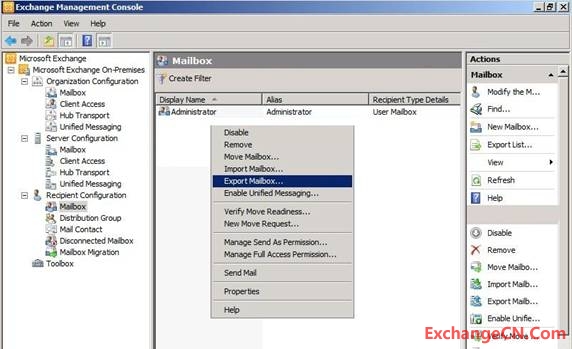
Figure 4: Mailbox Export in Exchange Administrative Console
When this is done, we need to specify the location of the target mailbox and the target server or the location of the personal folder (PST).
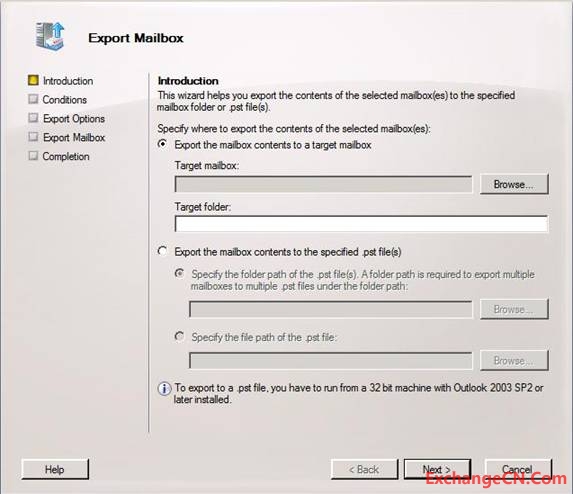
Figure 5: Detailled information on Exporting Mailbox
Importing a mailbox is quick and easy. You can see what option to choose from the Figure below.
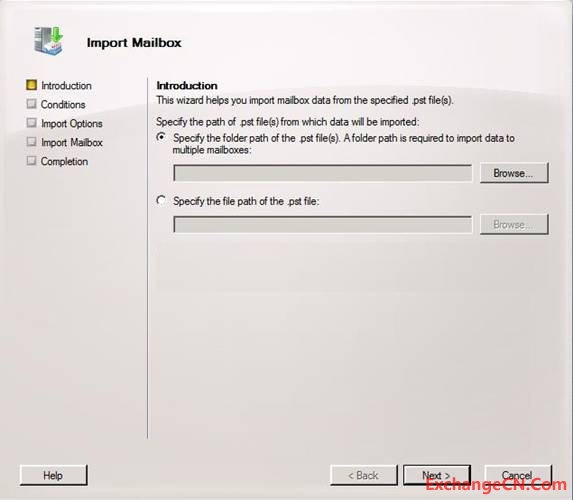
Figure 6: Importing a mailbox using Exchange Management Console
The reason why Microsoft has disabled this feature may be (apart from the fact that it may come back in the final release or a first Service Pack) this task is especially for a mail server administrator and not for the general administrator.
- 微软将推出卫星解决方案:可连接到 Azure 云服务 - 2020年9月17日
- Windows Terminal 1.0正式发布 - 2020年5月25日
- Azure Lighthouse 相关介绍 - 2020年3月2日
还没有评论